Customize T3 Framework
The very first things you need to know when you want to customize T3 framework.
I. Template override
Template and Style definition
Many users are concerned about the definition of Template and Style. In the very basic way, template includes styles. In one site, you can use one template but multiple styles. You can create multiple styles from a template.
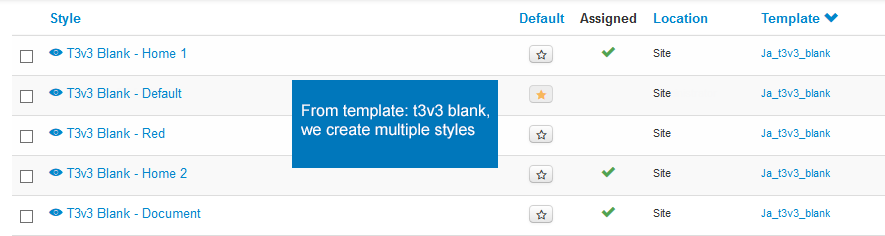
In one site, multiple styles can be used simultaneously, each style can be applied in specific menus --> override default styles in the menus.
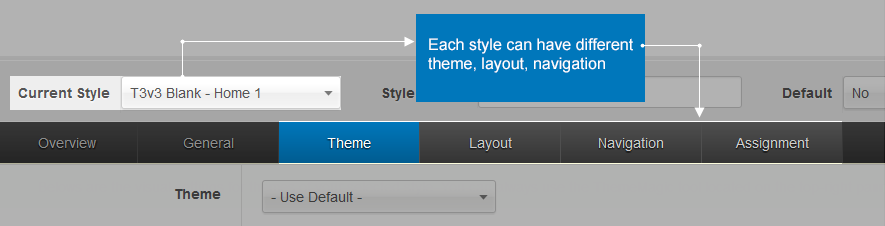
Template Override
With T3, you can override default style in specific menu items. The override feature help you to have different layouts, theme, navigation ... for your front-page.
There are 3 steps that you should follow to override style.
Step 1: Create override style.
To create new override style, you can duplicate the default style or you can go to the edit page of the default style then save it as copy.
Duplicate Style

Or Save as Copy

Step 2: Configure style
After you create an override template, you can configure the template (change layout, color, ...). Firstly, let's check the layout setting of the default template.
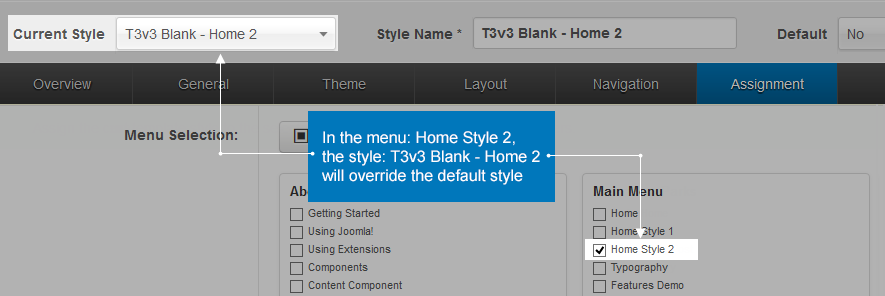
Step 3: Assign style to menu
Template Width Customization
Template width is defined by grid, and divided into number of columns (default is 12 columns).
To change width of template, open file: variables.less in: templates/t3_blank/less then change defined width of template.
// Default 940px grid
// -------------------------
@T3gridWidth:             940px;  // T3 add. For non-responsive layout.
@gridColumns:             12;
@gridGutterWidth:         40px;
@gridColumnWidth:         floor((@T3gridWidth - @gridGutterWidth * (@gridColumns - 1)) / @gridColumns);
@gridRowWidth:            (@gridColumns * @gridColumnWidth) + (@gridGutterWidth * (@gridColumns - 1));
We base on gridcolumn of 12. Width of each column is:
floor((@T3gridWidth - @gridGutterWidth * (@gridColumns - 1)) / @gridColumns);

To change width of template, you just need to change T3gridWidth. The gridColumnWidth will be auto caculated.
From the base, we build up responsive grid system as follow:
// 1200px min
@T3gridWidth1200:         1200px;  // T3 add
@gridGutterWidth1200:     40px;
@gridColumnWidth1200:     floor((@T3gridWidth1200 - @gridGutterWidth1200 * (@gridColumns - 1)) / @gridColumns);
@gridRowWidth1200:        (@gridColumns * @gridColumnWidth1200) + (@gridGutterWidth1200 * (@gridColumns - 1));

// 980px-1199px
@T3gridWidth980:          940px;  // T3 add
@gridGutterWidth980:      40px;
@gridColumnWidth980:      floor((@T3gridWidth980 - @gridGutterWidth980 * (@gridColumns - 1)) / @gridColumns);
@gridRowWidth980:         (@gridColumns * @gridColumnWidth980) + (@gridGutterWidth980 * (@gridColumns - 1));

// T3 Add: 768px-979px
@T3gridWidth768:          740px;  // T3 add
@gridGutterWidth768:      20px;
@gridColumnWidth768:      floor((@T3gridWidth768 - @gridGutterWidth768 * (@gridColumns - 1)) / @gridColumns);
@gridRowWidth768:         (@gridColumns * @gridColumnWidth768) + (@gridGutterWidth768 * (@gridColumns - 1));
II. Theme Customization
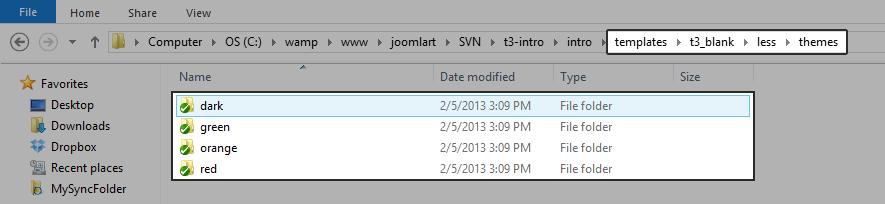
Theme List
All the themes folder are in folder: templates/t3_blank/less/themes/dark
In each theme folder, it has 3 files:

template.lessvariables.less: this file includes all default variablesvariables-custom.less: this file includes your custom variables when you customize theme.
Create new theme
The best way to create new theme is cloning theme from an existing theme. You can also add manually. If you add manually, follow the 2 steps:
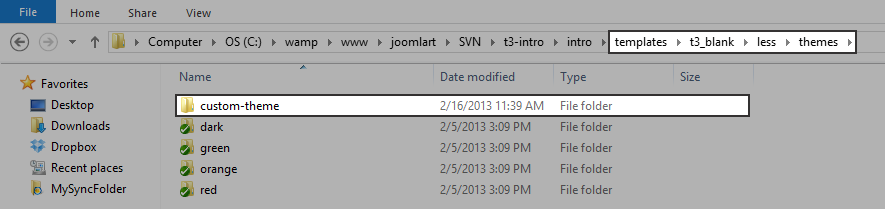
Step 1: Create theme folder
In the folder: templates/t3_blank/less/themes, create a theme folder. In this example, we name it: custom-theme
Step 2: add files
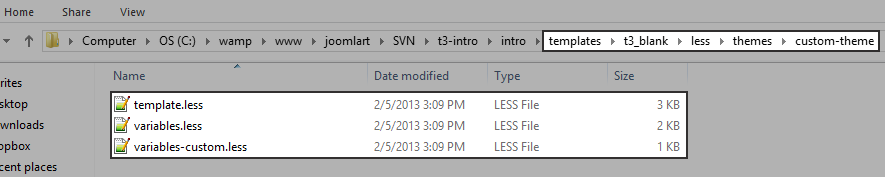
Each theme has 3 LESS files: template.less, variables.less, variables-custom.less. We add the files in folder: templates/t3_blank/less/themes/custom-theme
template.less, variables.less should be copied from an other theme. The file: variables-custom.less includes custom variables in the theme.
Customize Theme
To customize theme, you can use settings of template (Theme Setting tab or ThemeMagic) or customize the Theme LESS files located in:
templates/t3_blank/less/themes/Theme_Name
Compile LESS to CSS
Now, you will need to compile less to css so that new created theme folder will be compiled to css theme folder. Now, you will have a theme folder compiled in the folder: templates/t3_blank/css/themes/custom-theme
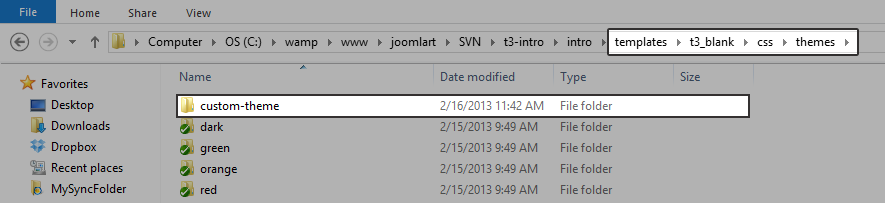
When compile LESS to CSS, each theme has an independent folder. The folder contains all necessary CSS files, it is not overridden from default theme --> when your site runs on a specific theme, it only loads css files from 1 folder --> so it will increase the speed of your site.
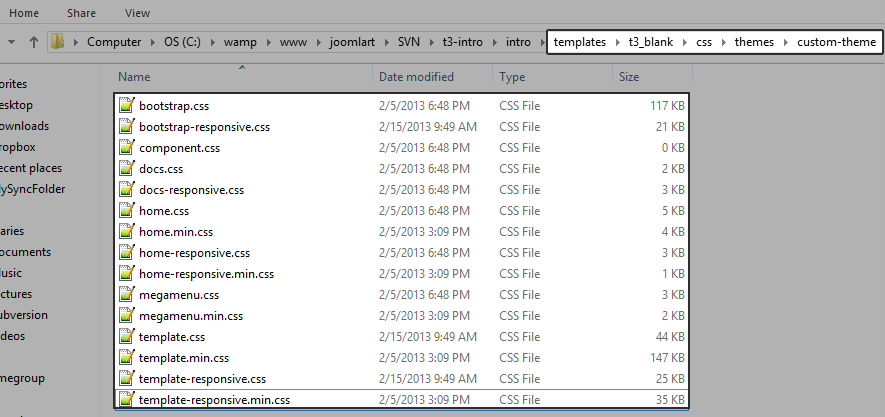
Some added CSS files are:
- home.css
- bootstrap.css
- bootstrap-responsive.css
- template.css
- template-responsive.css
- megamenu.css
- responsive-home.css
- home-responsive-home.css
- component.css
.min.css files are the compressed files. Your site uses the .min.css files when you enable the Optimize CSS option in the General setting.
- home.min.css
- bootstrap.min.css
- template.min.css
- template-responsive.min.css
- megamenu.min.css
- home-responsive.css
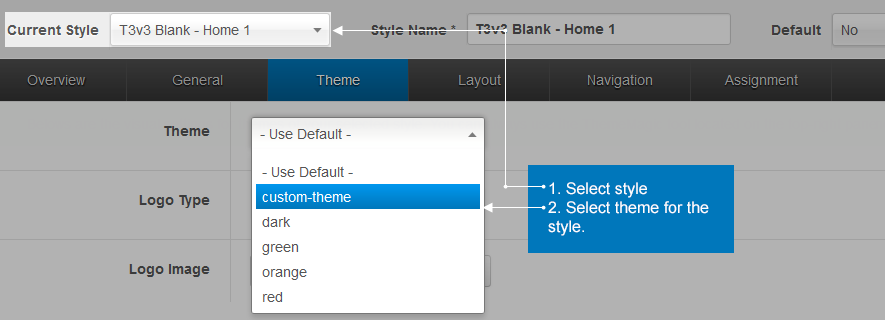
In the back-end, you can select the new created theme for style you want
III. Module Position
About Module position in T3 Framework
If you have used JA T3 V2, you may familiar with module position in the new version. There is not much difference. You can create unlimited module positions, then assign them to blocks.
Module position is added to a specific block so you have to defined which layout you want to add new module position to.
Add module position
Step 1: Add module position to block
All block files are located in: template/t3_blank/tpls/blocks. Open the block file you want to add new module position to.
<jdoc:include type="modules" name="<?php $this->_p('your_module_position_name') ?>" />
<!-- SIDEBAR 1 -->

        <div class="ja-sidebar ja-sidebar-1 <?php echo $this->getClass($layout, $col) ?>" <?php echo $this->getData ($layout, $col++) ?>>

          <jdoc:include type="modules" name="<?php $this->_p($sidebar1) ?>" style="JAxhtml" />

        </div>

        <!-- //SIDEBAR 1 -->
Step 2: Define new created module position
When done, you need to define the new created module position in the file: TemplateDetail.xml
 <positions>
   <position>your_module_position_name</position>
  </positions>
In the example, I will create a module position named custom-position in the layout: mainbody-content-left
<jdoc:include type="modules" name="<?php $this->_p($custom-position) ?>" style="JAxhtml" />
Now, I define the module position in TemplateDetail.xml file.
  <positions>
   <position>debug</position>
   <position>position-12</position>
   <position>position-13</position>
   <position>position-14</position>
   <position>position-15</position>
   <position>custom-position</position>    <! my created module position />
 </positions>
IV. Custom CSS
Custom template using CSS without changing LESS
T3 Framework developed with LESS, the LESS files are compiled to CSS files. Each time you compile, CSS files will be overridden so we suggest you not to use CSS to customize, develop your site because when you compile, your work can be lost.
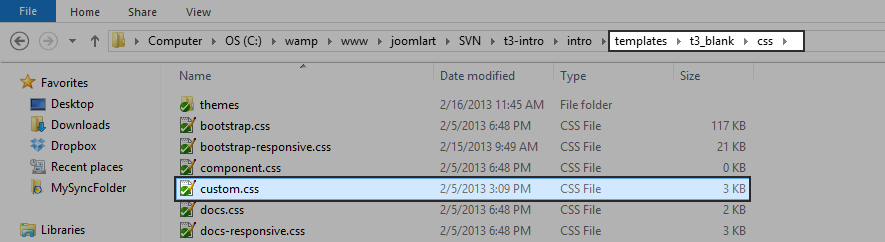
custom.css. The file is located in: templates/t3_blank/css .
Custom.css file
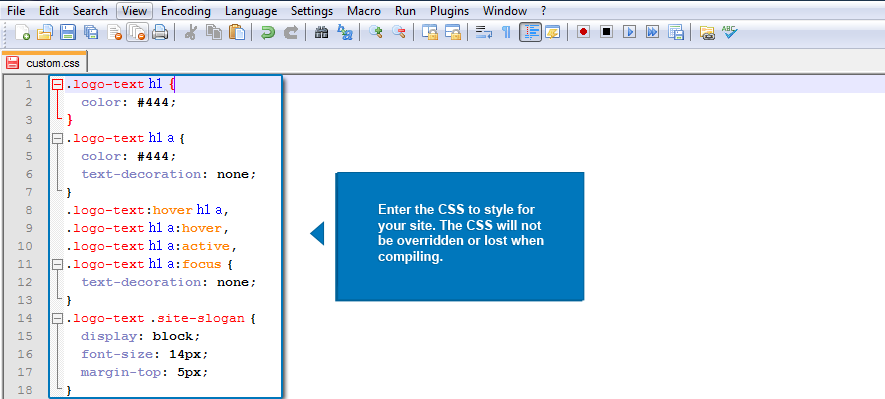
- The file is included by default, you don't need to create new one.
- The file is the last file to be called in your template so it will not be overridden.
- The file is not a compiled file from LESS so it will not be overridden or lost when you compile.
Working with the file
The Custom.css file is the same as any other CSS file. Enter the CSS to style for your template as normal when you work with the template.css or any other CSS files.
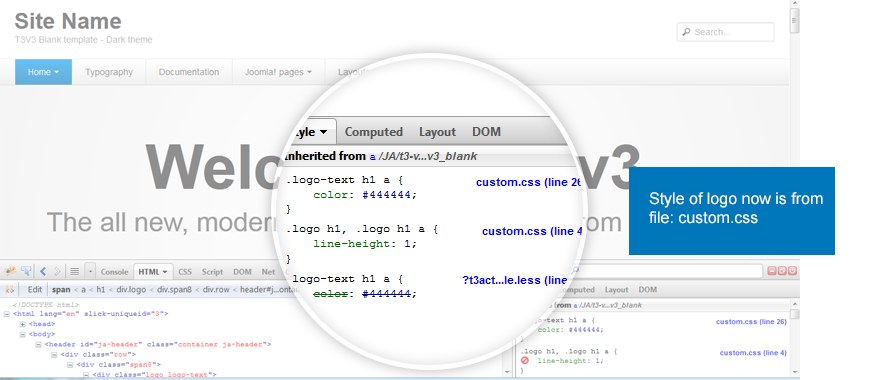
Let's check front-end
V. ThemeMagic Customization
ThemeMagic
ThemeMagic is one of the outstanding feature in T3 framework. It helps you in customizing your JoomlArt T3 Framework version 3 based Joomla template without having to search for the right file or without diving into the code.
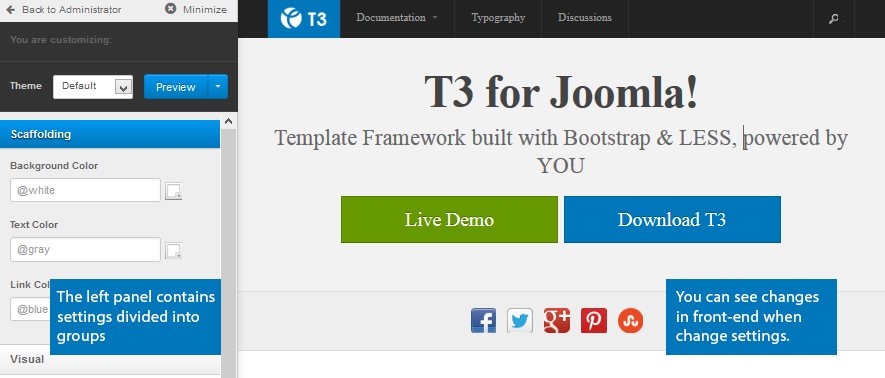
Still have trouble?T3 Framework is powerful by its easy customization with ThemeMagic. You can allow unlimited parameters to be configured in the ThemeMagic. The left menu is the configuration panel, the right panel is your homepage, so when you change setting of parameters, click on "Preview" button, then you can view the changes in your site front-end in the right panel.
Let's view parameters in the Thememagic.
Add new parameters to ThemeMagic
You can allow unlimited number of parameters to be configured. New parameters to an existing group or you can define a new group then add new parameters to the group. The customized parameters is set in the templateDetail.xml file in the folder: templates/t3_blank
Step 1. Define a new group
<fieldset name="custom1_params" label="CUSTOM1_LABEL">

</fieldset>
Step 2. Define parameter in new group
<field name="inputBorderRadius"

type="text"

default="3px"

class="input-tiny"

label="CUSTOM1_ELEMENT_RADIUS_LABEL"

description="CUSTOM1_ELEMENT_RADIUS_DESC" />

</field>
Step 3. Define a LESS parameter
Define a LESS parameter with the same name as above @inputBorderRadius: 3px;
Step 4. Use "@input BorderRadius" at somewhere in LESS file
It depends on you, just think how you want to use this parameter and how it affects to the template. It is required that you have some base knowledge about LESS and CSS. We suggest you to add to the file: style.less
modal-t3-signup {
.border-radius: @inputBorderRadius;
)
Step 5. Define language key
Open the language file of the template (language\en-GB\en-GB.tpl_t3_blank.ini) and define language key that you use to define parameters above.