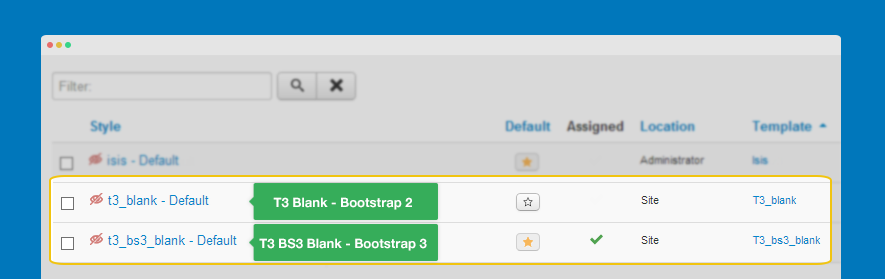
T3 BS3 Blank and T3 Blank template
T3 Framework version 2.0.x supports 2 base template: T3 Blank template and T3 BS3 Blank template. T3 Blank template integrates Bootstrap 2 while T3 BS3 Blank template integrates Bootstrap 3.
Global Setting
The global settings are applied for all styles, themes and layout, no matter the settings are changed in any styles.
Development Mode
This is an important option. You should clearly define the differences between enabling and disabling the option.
Enable Development Mode
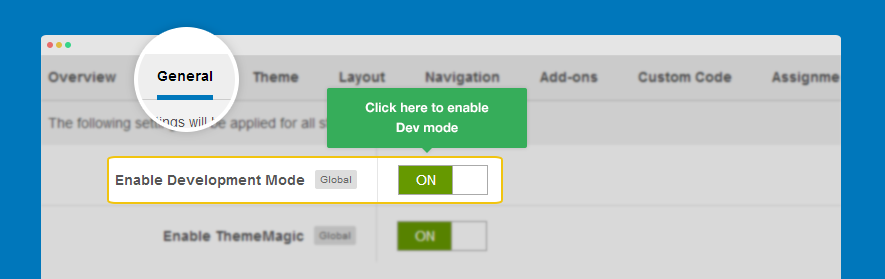
When you are developing your site, you should enable this option. Once it's turned on, your site directly runs on original files - LESS files. The LESS files are located in templates/t3_bs3_blank_less/ or templates/t3_blank/less
When developing your site, Firebug is a good tool. You can use this tool to track
In this mode, it is easy for you to develop your site with LESS but it will decrease your site speed so when you finish developing, turn the option off.
Disable Development Mode
When you are not developing your site, you should disable the option. This will increase your site speed. In this mode, your site runs on CSS, not LESS. The CSS files are compiled from LESS files.
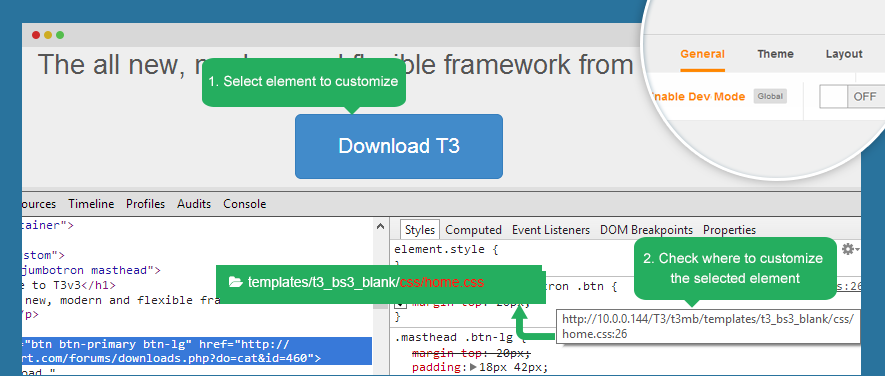
The CSS files are located in templates\t3_bs3_blank\css. But we don't recommend you to customize your site with the CSS files in this folder as each time you compile LESS to CSS, the files will be overridden.
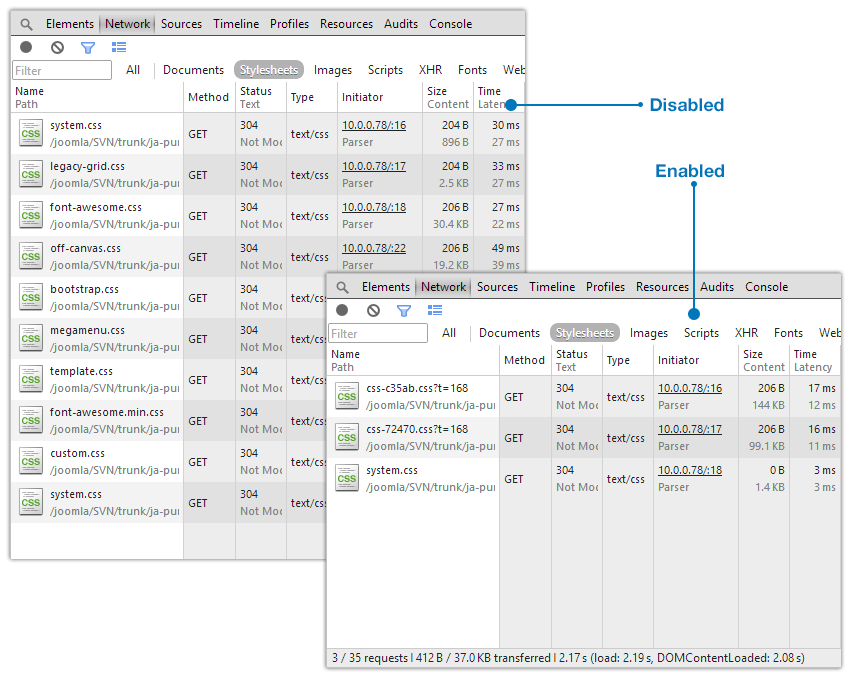
In case Development mode is off, you are allowed to enable or disable option: Optimize CSS. This option will optimize and join CSS files. By this way it will improve your site performance.
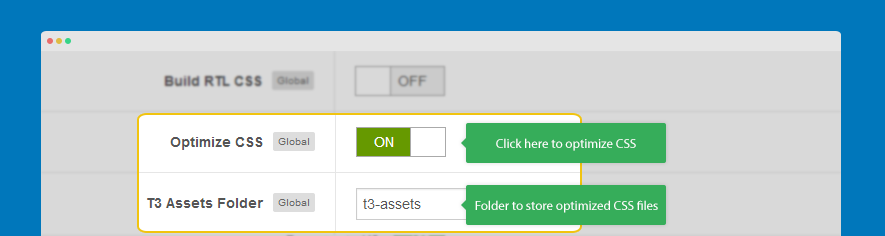
When enabled, the optimized and joined CSS files will be located in the defined T3 Assets Folder folder. By default this folder is t3-assets.
Enable Responsive
T3 is a responsive template framework. You can turn this feature on or off.
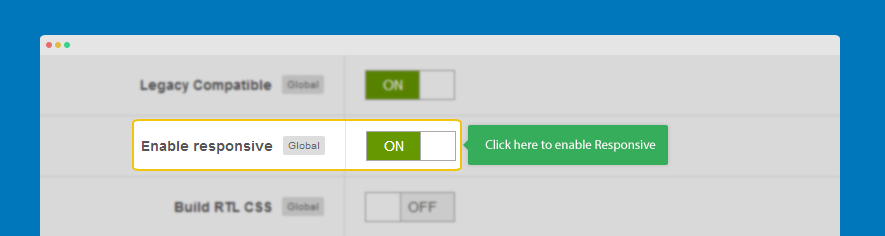
When the option is disabled, your site is a non-responsive site and you can set the fixed width size for your site. Once it's disabled, all responsive files will not be loaded.

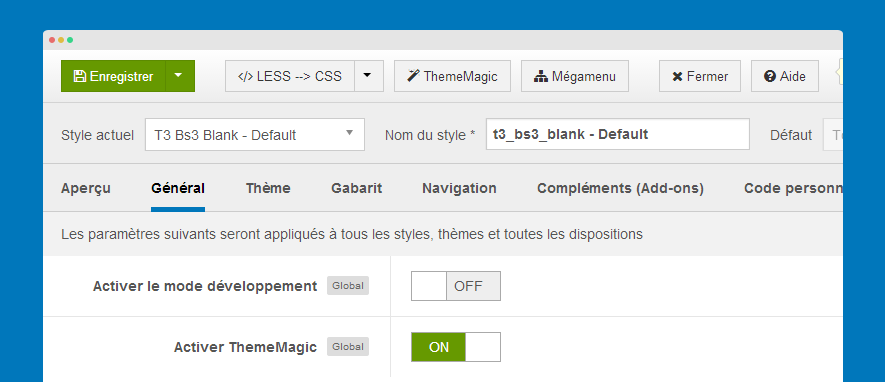
Enable ThemeMagic
- Step 1: Enable the option "Enable ThemeMagic"
- Step 2: Access The ThemeMagic setting panel
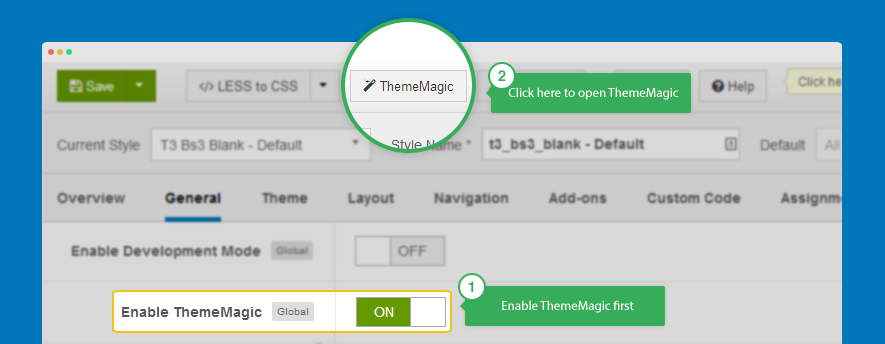
Note: This option should be enabled only when you customize your theme using ThemeMagic, after you finish your customization, you should turn it off.
Follow THIS LINK to see how to work with ThemeMagic and customize.
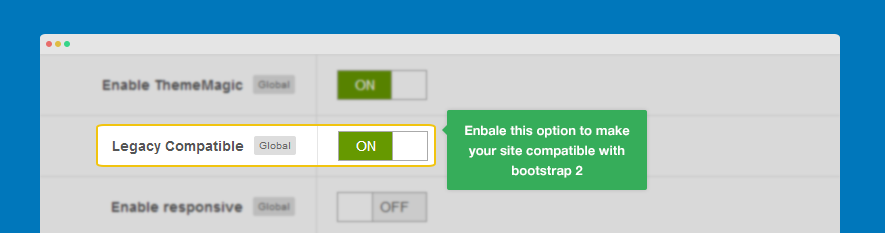
Enable Bootstrap 2 compatibility and Font Awesome 3
This option will make your site compatible with Bootstrap 2. For example, you use some extensions that intergrates Bootstrap 2. To make the extensions work in your site, it will load some CSS of Bootstrap 2. It will load font awesome version 3 as well.
Compile LESS to CSS
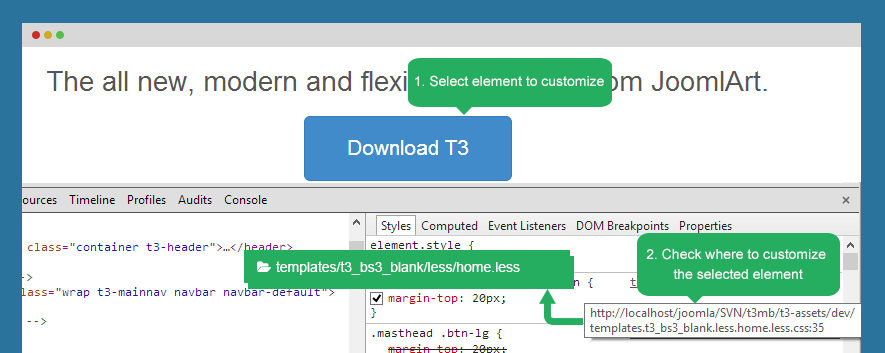
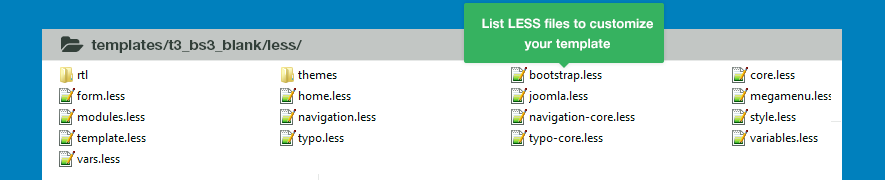
Ultilize LESS
T3 is developed with LESS. When customize your site, we suggest you to work with LESS files. The LESS files will be compiled to CSS files later on. All the LESS files for customization are located in templates/t3_bs3_blank/less.
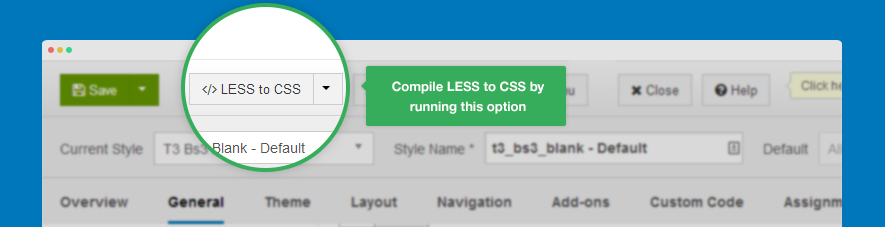
When site development is complete, you should compile LESS to CSS. This option will compile LESS files to CSS files. All your customization in LESS files will be compiled to corresponding CSS files.
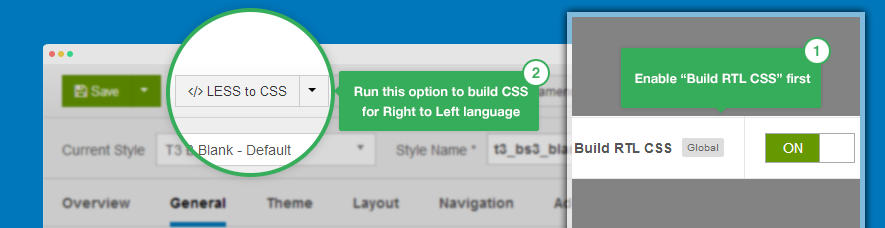
Build CSS for RTL language
T3 supports RTL (right to left) language style. The LESS file of RTL is located in templates/t3_bs3_blank/less/rtl.
When compile LESS to CSS, you can select to build CSS for RTL language or not. To active this option, please enable option Build RTL CSS in the General tab then run the Compile LESS to CSS.
Theme Settings
The Theme settings allows you to configure themes, logo. The settings can be also configured in the ThemeMagic setting panel
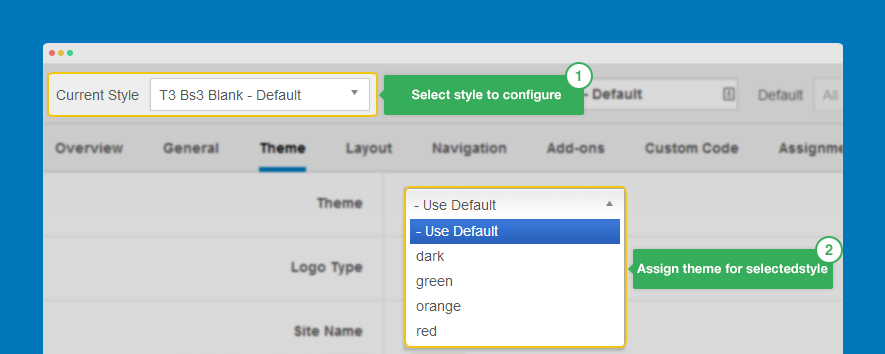
Theme Setting
Select a theme for current style. Each style goes with one theme.
Logo Setting
T3 allows you to select image or text logo. If you select to use image logo, browse to the image that is displayed as logo. If you select text logo, enter the text that is displayed as logo, slogan is optional.
Now, let's see how front-end looks like.
Change Logo Image and Customize Logo size
An other way to change logo is change the logo image path in the file: variables.less in: templates/ja_t3v3_blank/less. You can also customize the logo size in this file.
 // T3 LOGO
// --------------------------------------------------
@T3logoWidth:     270px;
@T3logoHeight:    65px;

@T3LogoImage:     "../images/logo.png";
Please refer this LINK to know more detail about how to customize logo.
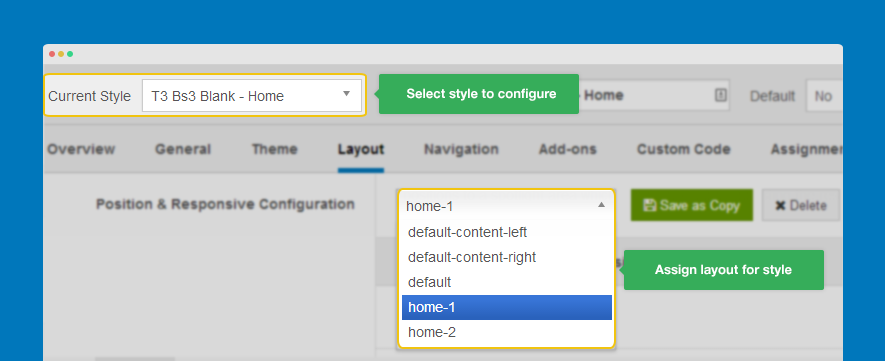
Layout Setting
Layout configuration
T3 comes with ease of layout customization. The visual layout configuration allows you to configure layout never easier.
Still have trouble?Select Layout for style
In T3 framework, each style will use one layout (but please keep in mind that one site use many styles --> so one site can use multiple layouts simultaneously because T3 use multiple styles simultaneously).
Layout Configuration
In the layout setting, there are 2 parts to be configured: Layout structure and Responsive layout configuration.
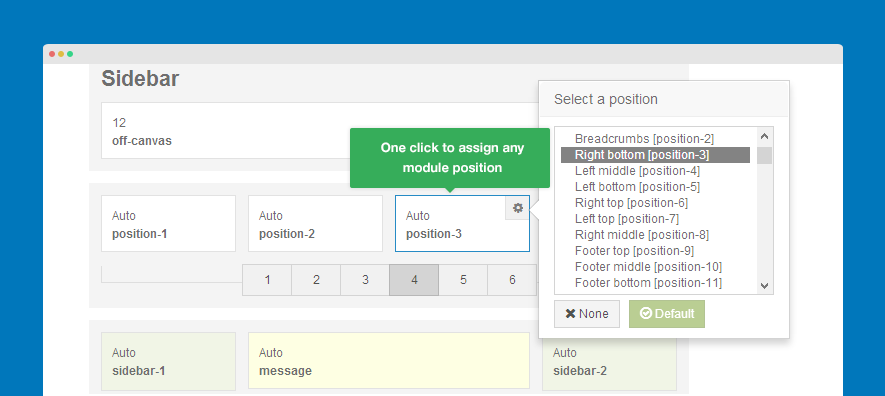
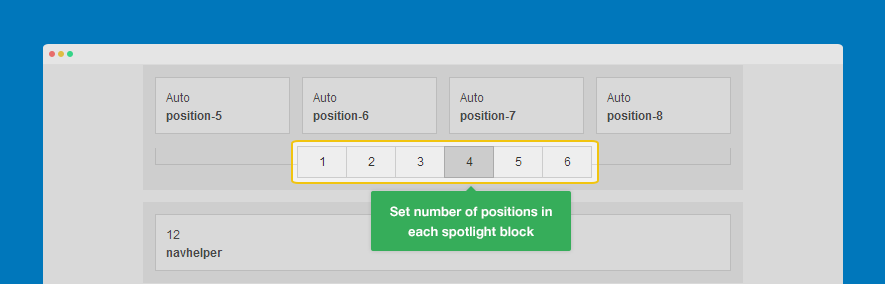
Layout Structure Configuration
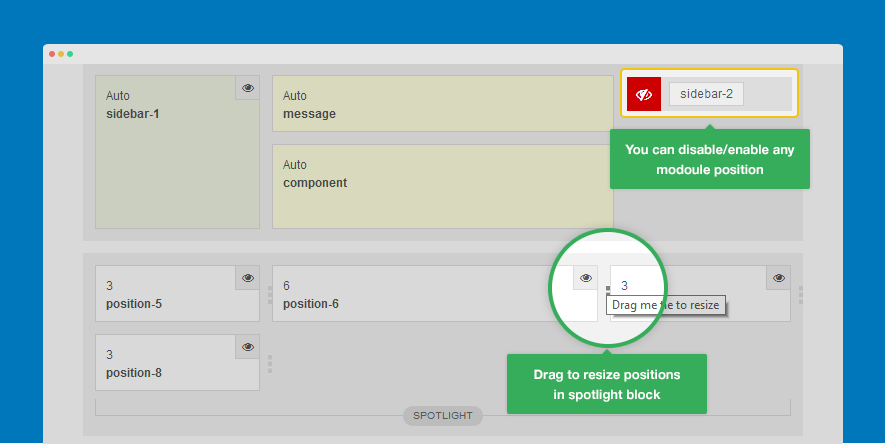
Assign module position.
Set number of columns in each spotlight block.
Responsive Layout Configuration
Select responsive layout.
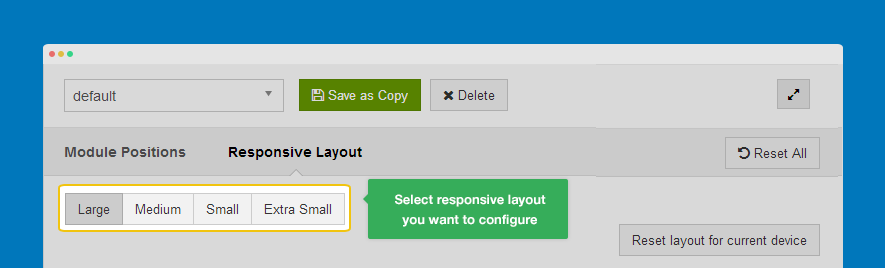
In each responsive layout, you can enable/disable content, resize module positions in spotlight block.
Off-Canvas Sidebar configuration
The section has been moved to Menu system section. Check it out now.
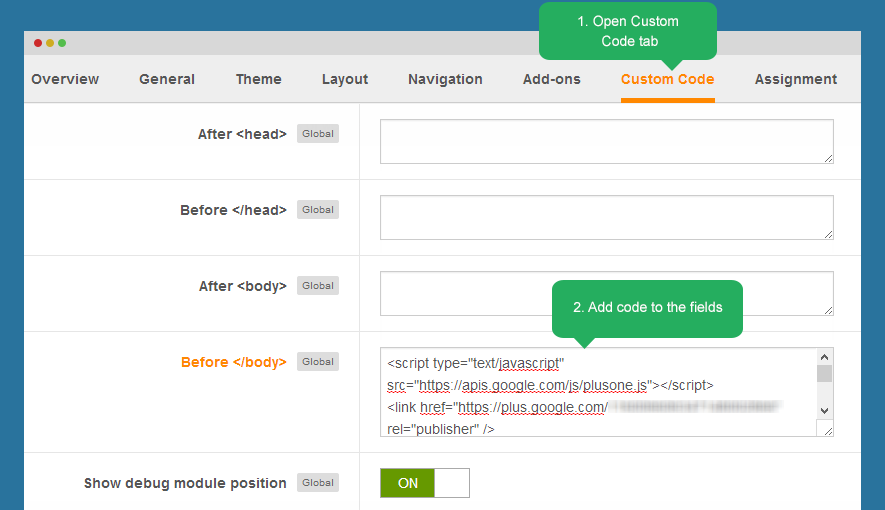
Custom Code
The tab includes settings that allows you to add scripts like Google Analytic, Live chat service ... to the any position.
To add scripts, please open tab Custom Code then select to add the scripts to: after , before , after , or before .
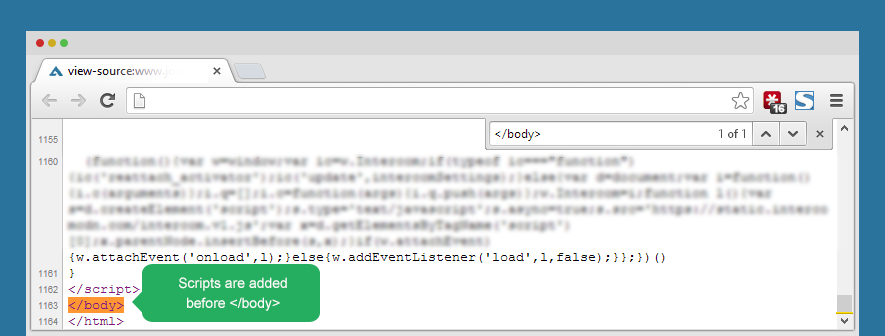
In front-page, view source to see whether the scripts are added or not.
Optimize CSS and JS
Available version: 2.1.0
Optimize CSS and JS is to improve your site performance by join and compress CSS and JS files so that the total size and number of requests will be decreased.
Now let's check how the feature affect your site.
#1: CSS optimization
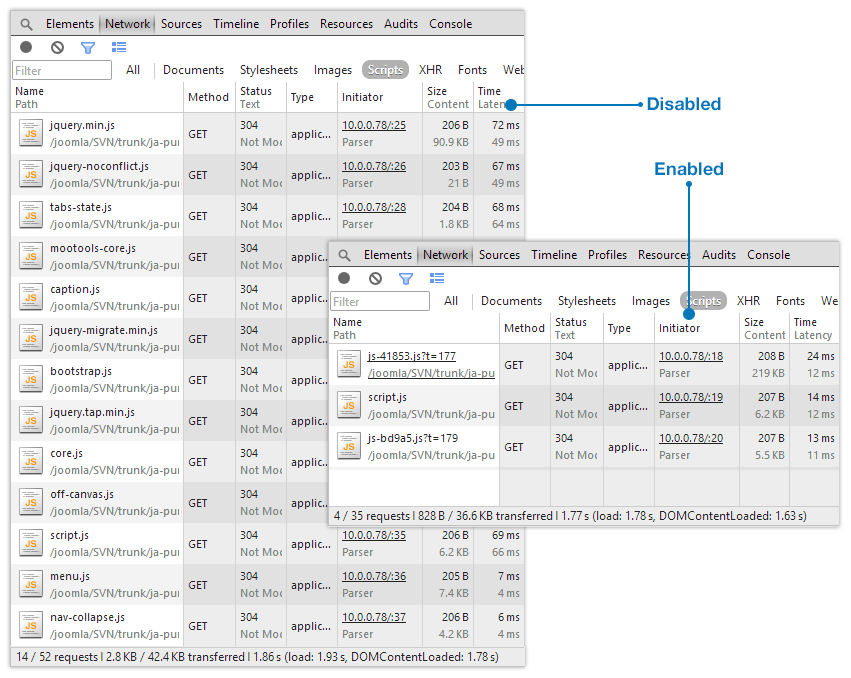
#2: JS optimization
Enable optimization
To enable this feature, please turn off the development mode in General tab in any T3 blank template style back-end setting.
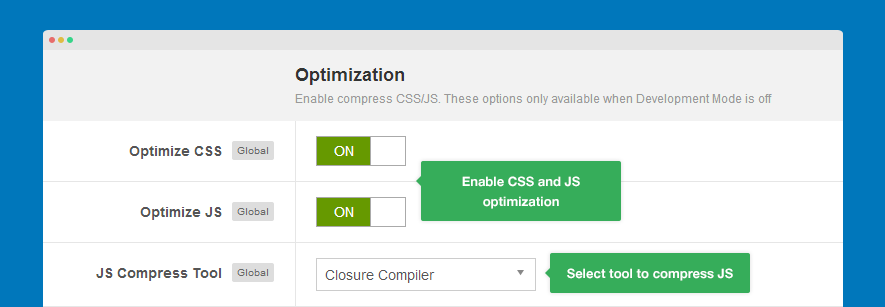
Now enable options Optimize CSS and Optimize JS.
For JS optimization, we provide 2 tools to compress:
- Closure Compiler
- JSMIN
In comparision, Closure compiler has better compress and more accurate but it limits the size of optimization group (under 200kb).
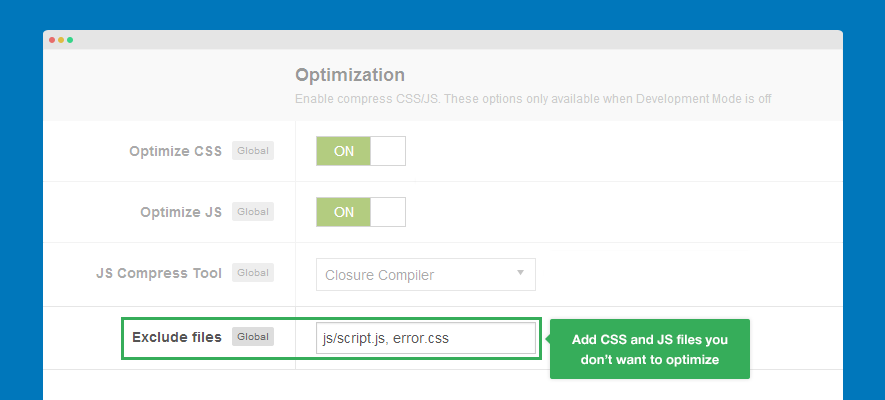
Exclude files to be optimized
You can exclude CSS and JS files that you don't want to optimize, just add the file name, if you have many files, please saperate them with comma. If you have 2 same files, please add full path to the files to distinguish.
How optimized files are generated?
When the optimization option is enabled, the optimized CSS and JS files will be auto generated when a page is viewed in the first time. If there is any change in the CSS, JS loaded in a page, new optimized JS and CSS files will be auto gererated again. So to prevent from having a lot of optimized CSS and JS files, you should check before turn the Optimization option on.
All the optimized CSS are located in templates/purity_iii/t3-assets/css folder and the optimized JS files are located in templates/purity_iii/t3-assets/js.
Support add-ons
Available version: 2.1.0 and only for T3 BS3 Blank template
In back-end setting of template style any template developed with T3 framework, you will see Add-ons tab, this tab include add-ons for T3. Currently it has configuration for Off-canvas sidebar and Extended template style.
Off-canvas sidebar
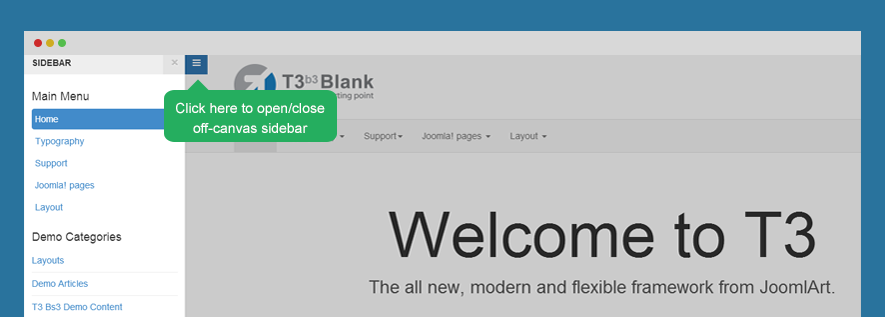
Off-canvas sidebar can be used to display flexible content, you can use it to display static content or use it as a menu system of your site.
Looking for how-to docs of Off-canvas sidebar? Check it out now.
Template extended style
This feature allows to load a Stylesheet (.less) file to specific pages. It's specially useful when you want to make a third party extension to be compatible with your site or customize the style of the third party extension.
Step 1: create stylesheet file
Create .less file in templates\t3_bs3_blank\less\extras. If you don't see the extras folder, please create the folder.
Step 2: assign the stylesheet to pages you want
Open back-end setting of T3 BS3 blank template style, in the Add-ons tab, assign the new created stylesheet to the pages that will load the stylesheet.
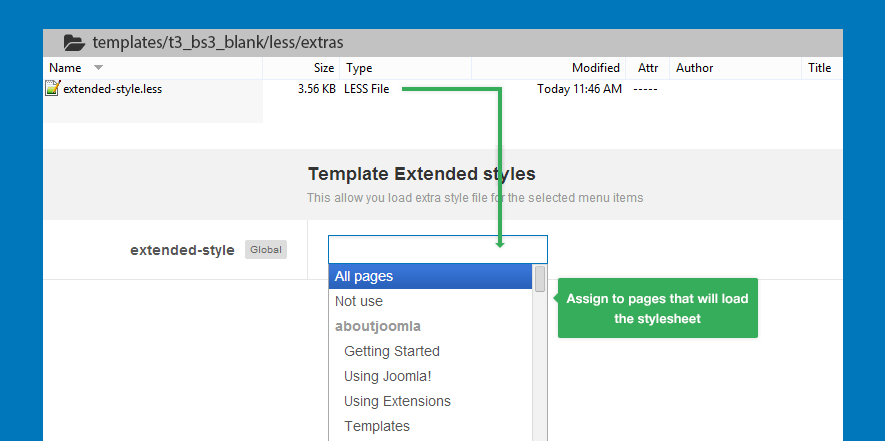
If you don't want the stylesheet to load in any page, just leave it blank or assign to Not use. If you want to use it in all pages, assign to All pages.
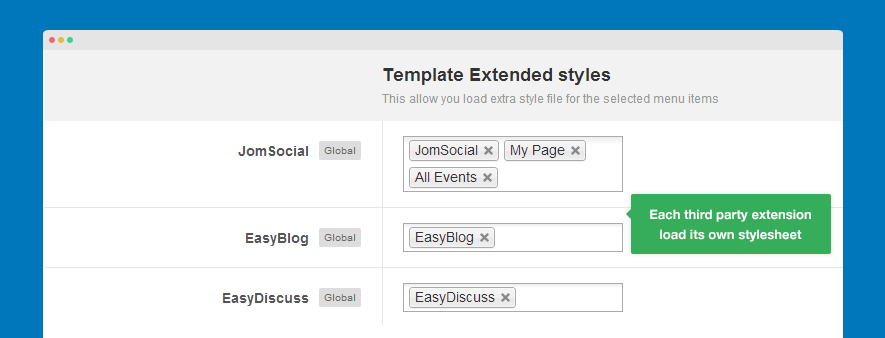
Purity III is the first template that apply the new feature. In Purity III, it supports number of third party extensions, the customized style of each third party extensions is stored in its own .less file.
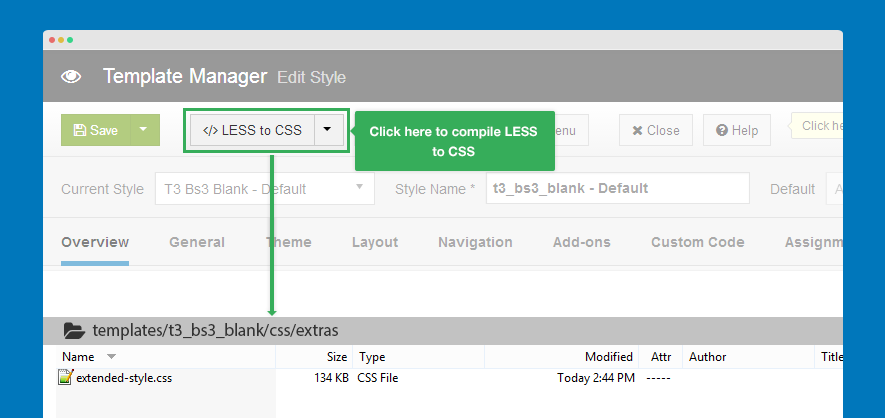
Step 3: compile LESS to CSS
When you compile LESS to CSS, the .less file will be compiled to .css file and it's stored in templates\t3_bs3_blank\css\extras.
Style Overrides
About Template and style
T3 Framework supports 2 starter templates: T3 Blank template (Bootstrap 2 integration) and T3 BS3 Blank template (Bootstrap 3 integration).
For each template, you can create unlimited styles that are to override the default style.
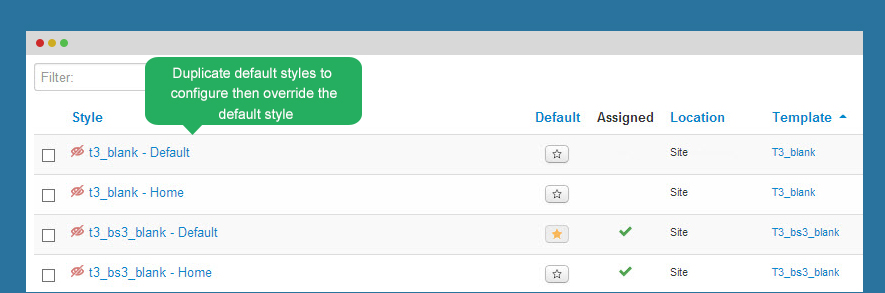
Style Override
Each style includes its own theme, layout, logo, navigation ... When creating new style, you can configure those things and override the default style.
3 steps to override style
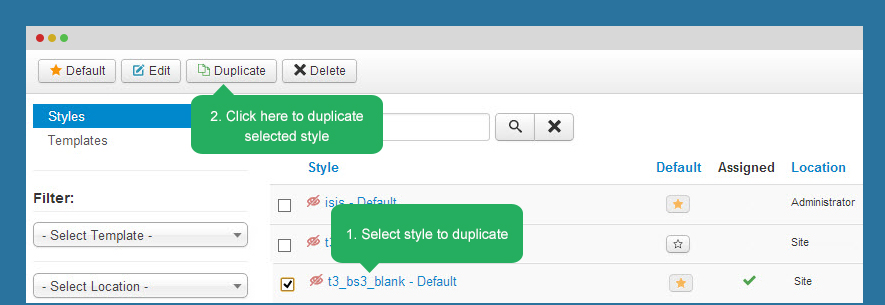
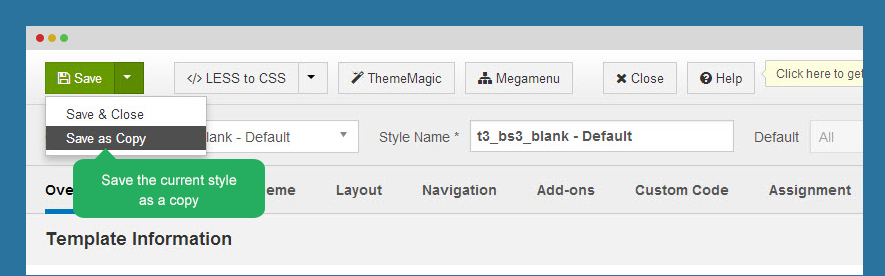
Step 1: Create override style
To create new override style, you can duplicate the default style or you can save as copy in setting panel of any style.
Duplicate Style
Or Save as Copy
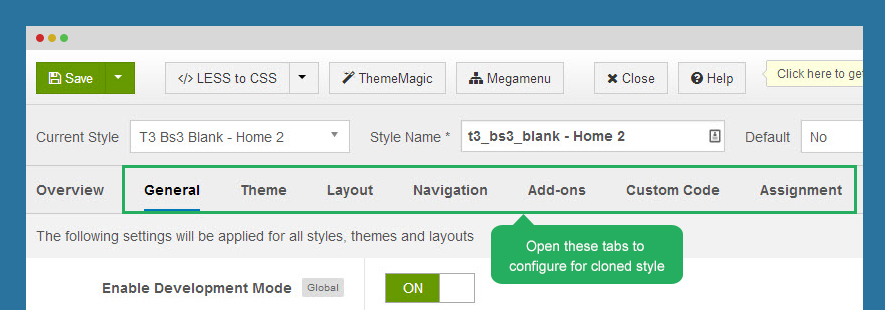
Step 2: Configure style
Now open the clone style then configure theme, layout, navigation ...
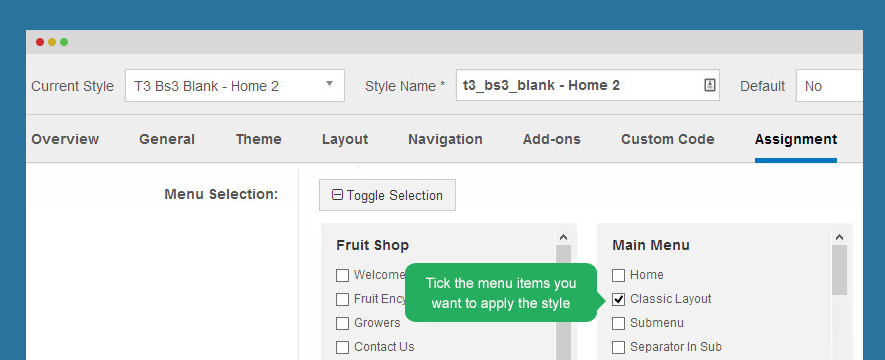
Step 3: Assign menu items for the style
Open the tab Assignment the tick on the menu items that you want to apply the style. The style will override default style in selected menu items.
French and Italian translation package
Thanks to community who helped us to make french and italian translation package. You can download and install to the your system.
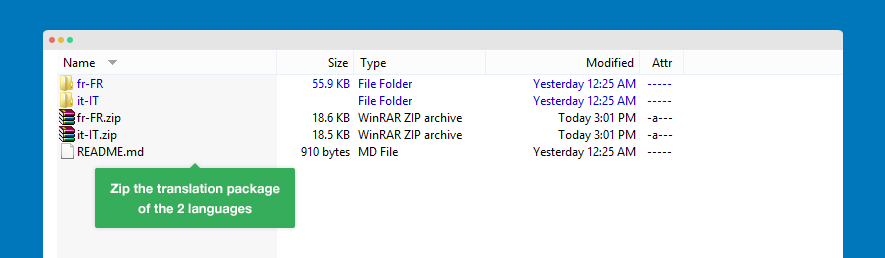
Step 1: download translation package
When you view T3 framework project on Github, you will see translation folder.
Download the T3 framework package, zip the folder of translation folder of the 2 languages.
Step 2: install French language
Go to Extensions >> Extension manager >> Install languages, select language then install.

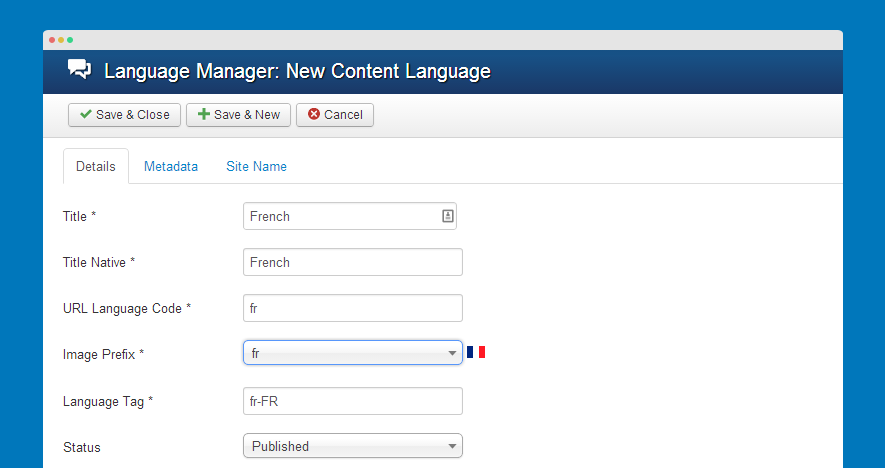
Step 3: create content language for French
Go to Extensions >> Language manager >> content, create new content langauge.
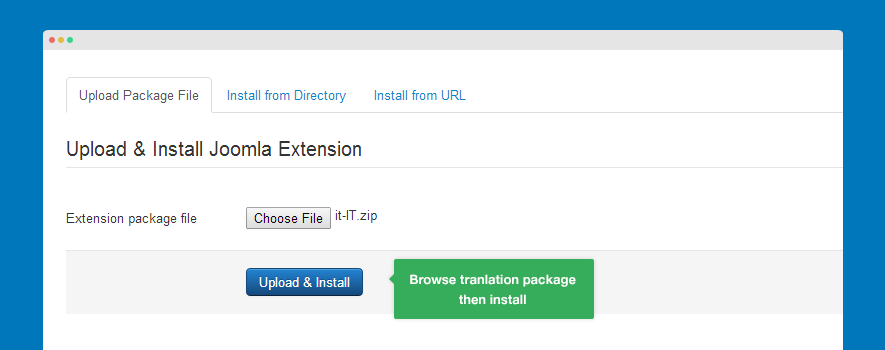
Step 4: install French translation package
Access your template style manager >> Extensions >> Extension Manager. Browse the translation package then install.
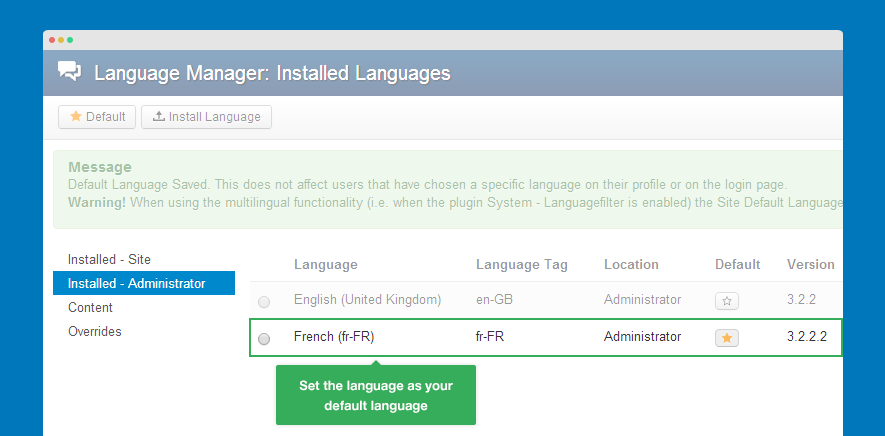
Step 5: set French as default langauge
Back to Extensions >> Language manager >> Installed Administrator, set French as default language.
Now go to T3 blank template style, you will see it's translated to french.